Showing posts with label invites. Show all posts

Monday, July 11

Kicking Up My Heels, DIY Style

Happy Monday! Another weekend down and closer to W-Day. I'm starting to feel time compress like this downward spiral.


Isn't that a cool image? I love me some google searching!

Anyway, it's high time to buckle down and get to work on our invitations. They came in two months ago and are sitting in boxes waiting for a loving someone to show them the light of day. So I did what any rational procrastinator would do and focused all my effort and attention.........on something else.

But not to worry, I promise that it was a wedding related project. Remember these lovelies?

personal photo

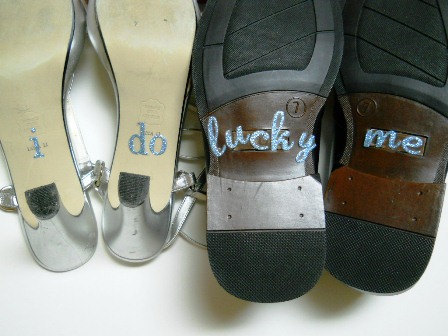
The sequin-covered topside makes me swoon every time I see them. The soles, on the other hand, were lacking a certain sparkle. You DIY-brides know what I'm talking about. 'I do' stickers! Inspiration abounds with a quick google image search.


Super duper cute, right? How adorable is the second photo as her 'something blue' with the added bonus of well wishes from her bridesmaids? My fellow brides on the Weddingbee message boards are also in on the sweetness.

icedchaitea 

Mrs.tobe 

An Etsy.com search yields over 80 options for 'I do' stickers. Grooms can also get in on the action and even go so far as to announce cold feet quite literally! 


With so many inspirations and options to choose from, this should be a no-brainer, right? Except with what you already know, I must find a way to complicate even a seemingly straightforward project. So I started my search at Michael's Arts & Crafts for the perfect stickers. There are at least 10 stores within my work geography and you can bet I checked the racks of at least 8 of them.

After finding a font that appealed to me in the right size and with numbers as well as letters (this is not as easy as you might initially think!) I consulted a friend about my choice. She liked them except wished they had more depth. Inspiration struck again at Michael's where I discovered adhesive faux pearl bead embellishments. What if I put them on top of the sticker to get more of a 3-D effect?

personal photo

For two hours I plucked those little suckers and stuck them lovingly to 12 letters & numbers. Look for my full tutorial in tomorrow's post. Until then, here's a peek at the finished product. I'm so pleased with the result!

personal photo

Nothing compares to crafting on a lazy Sunday in pajamas, haha! A special thanks goes to Mr. PS for snapping this shot. Now if only I could magically transform that pile of waiting invitations...I guess that's what next Sunday is for.

personal photo

What wedding DIY projects are on your list? How do you prioritize which ones to tackle and what's been most rewarding so far?

ps. xoxox

pps. I'd like to offer a heartfelt "CONGRATULATIONS" to my friend Bellanouva who found herself engaged this past Saturday. Yay!


Monday, March 14

Save the Date!

The next post to follow would normally be the story about how Mr. PS and I met…but the final design of our Save the Date (STD) cards is finished. I’m so excited to share, we’ll rewind back to the beginning soon, I promise.

And now for the big reveal!

First, after scouring the internet through hundreds of different designs like this...

and this...

 via

I changed my mind for a style that could incorporate one of our engagement photos.  Hundreds of choices later, we decided to use a template from shutterfly.com. The design was 20% off, and I was able to apply another 20% coupon from an email promotion.  I saved almost half off the original price and avoided countless hours of frustration printing these at home. Score!


[Quick public service announcement - many websites now offer online tools where you can customize the text and upload your photo to get a digital proof of the design before you order. As a visual person, the tool made me confident in my decision to purchase the order.]

Most couples would address the envelopes, add a stamp, and be done with it. Yet, here’s the point where reading one too many wedding blogs brought to my attention the idea of do-it-yourself. I'm not super creative, but I can be crafty with the right tools.  First, I learned about a simple ‘corner rounding’ tool. It’s a punch that elegantly rounds the square corner of a piece of paper. Voila!


Then, after a sale waiting game for cardstock and scrapbook paper to go from 69 cents per sheet to 4 sheets for $1, it was time to roll up my sleeves and break out the paper slicer.  Each sheet could make 4 mounting layers or 4 envelope liners.  After all that cutting, I sandwiched half a business card magnet between the photo and pink cardstock layer. Trial, error and persistence paid off -- I thought I could cut the magnets into thirds, and divided a whole pack of 10 magnets. Oops! The card slid to the floor when I tried to put it on the fridge. In the words of Homer Simpson, 'Doh!'


Now our our guests can post it on the fridge as a reminder of our big day.  The final touch to the card was a scratch-off sticker to incorporate an element of fun and surprise for the addressee!


We’re not quite finished yet, though. Cutting a pretty striped paper envelope liner using DIY instructions from the internet and double-sided tape as adhesive to the inside of a plain silver envelope, here’s what our guests can look forward to receiving:


There's something personally gratifying about this semi-DIY craft project.  Now, I just have to repeat each step 140 times and mail by March 30…no problem!

What do you think about my final product? And what DIY elements did/will you incorporate for your Save the Dates?


* personal photos unless otherwise attributed *